

1. 개요
파일 업로드를 효율적으로 처리하는 방법 중 하나로 Presigned URL을 활용한 방식이 있다.
Spring Boot 백엔드에서 AWS S3 Presigned URL을 생성하고, 클라이언트가 이를 사용해 S3에 직접 업로드하는 방식이다.
2. Presigned URL이란?
개념
S3에 직접 파일을 업로드하기 위해서는 해당 S3에 대한 접근 권한을 인증해야 한다.
접근 권한에 대한 인증을 마치면 S3에 업로드할 수 있는 URL을 발급해 주는데, 이 URL을 Presigned URL이라고 부른다.
발급받은 Presigned URL을 이용하면 브라우저에서 AWS S3 버킷에 바로 파일을 업로드할 수 있다.
필요한 이유
프론트가 입력한 데이터가 백서버를 거치지않고 바로 AWS S3에 저장되게 하기 위함
동작 방식
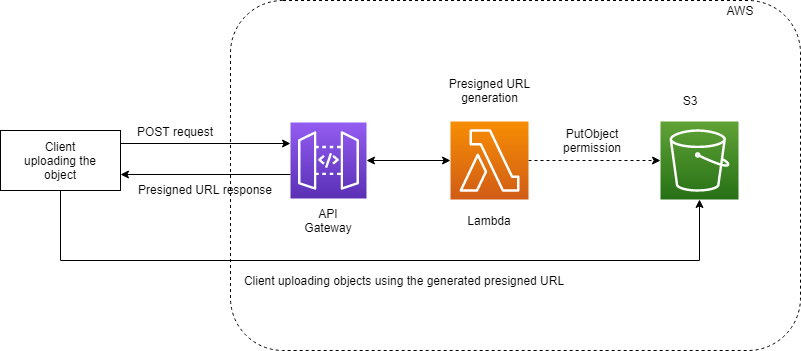
1. POST request
- 프론트에서 presigned URL생성을 위한 요청을 보냄
2. Presigned URL generation -> Presigned URL response
- s3버킷으로 파일을 전송할 수 있는 url을 생성하여 프론트로 보냄
3. Client uploading objects using the generated presigned URL
- 프론트에서 응답받은 url로 파일을 보냄 (put 요청)
3. Spring Boot에서 Presigned URL 생성하기
AWS SDK 설정
1) 의존성 추가
maven
<dependency>
    <groupId>software.amazon.awssdk</groupId>
    <artifactId>s3</artifactId>
    <version>2.20.40</version> <!-- 최신 버전 확인 후 사용 -->
</dependency>
gradle
dependencies {
    implementation 'software.amazon.awssdk:s3:2.20.40'
}
2) AWS 자격 증명 설정
AWS SDK는 IAM 사용자 또는 IAM 역할을 통해 인증이 필요하다.
IAM 사용자 생성 및 권한 설정
- AWS 콘솔에서 IAM 사용자 생성
- AmazonS3FullAccess 또는 최소한 Presigned URL을 생성할 수 있는 권한 부여
- AWS Acess Key, Secret Key 저장
application.yml 또는 application.properties 설정
application.yml
cloud:
  aws:
    credentials:
      access-key: YOUR_ACCESS_KEY
      secret-key: YOUR_SECRET_KEY
    region:
      static: ap-northeast-2  # 사용 중인 AWS 리전 (서울: ap-northeast-2)
    stack:
      auto: false
application.properties
cloud.aws.credentials.access-key=YOUR_ACCESS_KEY
cloud.aws.credentials.secret-key=YOUR_SECRET_KEY
cloud.aws.region.static=ap-northeast-2
cloud.aws.stack.auto=false
3) S3 버킷 정책 설정
S3 버킷이 PUT 요청을 허용하게 해야함
S3 콘솔에서 버킷 정책(Bucket Policy)을 아래와 같이 설정
{
    "Version": "2012-10-17",
    "Id": "Policy1739493412654",
    "Statement": [
        {
            "Sid": "Stmt1739493404165",
            "Effect": "Allow",
            "Principal": "*",
            "Action": [
                "s3:GetObject", // get요청도 허용
                "s3:PutObject"
            ],
            "Resource": "arn:aws:s3:::your-bucket-name/*"
        }
    ]
}
❗ 위 설정은 모든 사용자에게 업로드를 허용한 것, 특정 사용자나 역할에만 권한을 부여하도록 설정하는것이 안전하다.
Cors 설정
AWS에서도 Cors 설정을 해줘야 요청을 받을 수 있다.
[
    {
        "AllowedHeaders": [
            "*"
        ],
        "AllowedMethods": [
            "GET",
            "POST",
            "PUT",
            "DELETE"
        ],
        "AllowedOrigins": [
            "*"
        ],
        "ExposeHeaders": [
            "ETag"
        ]
    }
]
❗ 위 설정은 모든 사용자에게 업로드를 허용한 것, 특정 사용자나 역할에만 권한을 부여하도록 설정하는것이 안전하다.
API 작성
Presigned URL 발급받기 - Backend
@RestController
@RequestMapping("/api/s3")
public class S3Controller {
    private final AmazonS3 amazonS3;
    private final String bucketName = "your-bucket-name";

    public S3Controller(AmazonS3 amazonS3) {
        this.amazonS3 = amazonS3;
    }

    @GetMapping("/presigned-url")
    public ResponseEntity<String> generatePresignedUrl(@RequestParam String fileName) {
        Date expiration = new Date(System.currentTimeMillis() + 1000 * 60 * 10); // 10분 유효
        GeneratePresignedUrlRequest request = new GeneratePresignedUrlRequest(bucketName, fileName)
                .withMethod(HttpMethod.PUT)
                .withExpiration(expiration);

        URL presignedUrl = amazonS3.generatePresignedUrl(request);
        return ResponseEntity.ok(presignedUrl.toString());
    }
}
4. 클라이언트에서 Presigned URL로 업로드하기
async function uploadFile(file) {
    // Presigned URL 요청
    const response = await axios.get(`/api/s3/presigned-url?fileName=${file.name}`);
    const presignedUrl = response.data;

    // S3에 직접 업로드
    await axios.put(presignedUrl, file, {
        headers: { 'Content-Type': file.type }
    });

    console.log("업로드 성공!");
}
5. Presigned URL의 보안 고려사항
- Presigned URL의 만료 시간을 적절히 설정해야 함
- 특정 사용자에게만 발급하도록 인증 로직 추가
- 업로드 가능한 파일 타입을 제한할수도 있음
6. 결론
Presigned URL을 사용하면 백엔드의 부담을 줄이면서도 안전하게 파일을 업로드할 수 있다.
Spring Boot와 AWS SDK를 활용하면 간단하게 구현 가능
보안 설정을 고려하여 적절히 활용하자
'Spring' 카테고리의 다른 글
| Spring Boot + Gradle 멀티 모듈 프로젝트 설정 (0) | 2025.02.18 |
|---|---|
| Spring Boot에서 웹소켓(WebSocket) 사용하기 (0) | 2025.02.17 |
| [Spring] Spring Boot에서 OAuth 사용 (0) | 2025.02.13 |
| [Spring] Swagger (0) | 2025.02.10 |
| [Spring] Spring Boot에서 DB Replication (0) | 2025.02.10 |